I had been wanting to experiment with sourdough starter for a long time. I was pretty comfortable making bread with store-bought yeast and enjoyed making baguettes and country loaves for my family who loved eating it. However, I didn’t know what I needed to get started with sourdough starter. I seemed mysterious to me, this “mother” that people feed and keep alive and store for years, even decades. I knew they passed it down for generations. But how did you START the starter to begin with? You must need some special bugs, or juice, or magic. I needed to know how to make sourdough starter without yeast.
The sourdough starter journey
When I learned that starter required nothing more than flour and water, I was stunned. So I jumped on it. And when it became impossible to find yeast in the store because of a global pandemic, it made even more sense.
Bread in Hawaii is NOT cheap, especially good quality bread. So, the decision was an easy one for me to start experimenting with my own sourdough starter. I would try something new that I had been wanting to learn, and I’d be able to participate in something exciting that lots of people were doing. I’d save some money while eating bread that I trusted because I made it myself too.
Little did I know, I was in for a more complicated journey than I thought.
The starter recipe and method that I recommend
I started with the King Arthur Baking Company sourdough starter recipe. It’s referenced all over the internet, and it’s from the company that makes the flour that EVERYONE uses to make sourdough bread. So I thought I’d give it a shot.
It uses a 1 to 1 to 1 scheme with starter, flour, and water if you measure on a food scale. The recipe uses a cup for the basic measurement for the flour, which is where you get roughly 113 grams. I used the cup of flour to ½ cup of water measuring scheme that they provide until I got a scale. Get a scale! It changes everything.
If you keep within those ratios (1/1/1) and you’re using a scale to measure, your starter should work fine. You’ll see some recipes using 100g as the basic measure too, which is great. You’d just use 100g of flour, 100g of water, and 100g of starter. It’s not a magic number here. You can use more or less and get the same results for the most part. Read below about scaling down if you’d like to work with smaller amounts. Using grams as your measure makes it easy to scale your starter down to reduce waste.
The time frame for developing a sourdough starter is usually about one week. You’ll find solid advice to pay more attention to the state of your starter than to the days on the calendar, and I absolutely echo that advice. It takes me a bit longer to develop something usable here in Hawaii, but a week is a good guideline.
What kind of flour should I use for my sourdough starter?
I have used whole wheat, AP (all purpose), and bread flour. While they’re different, they all seem to work fine. There are some folks who believe that whole wheat flour is best to start with as it contains more of the good microorganisms that you need to form a sourdough starter. Also, if you’re going to be baking 100% whole wheat loaves, you may want a whole wheat starter at some point. Just try to stick with the same flour type throughout this whole process until you get your starter off and running.
For the record, I love King Arthur Unbleached All Purpose flour for this process and for baking as well. You can always use rye or whole wheat flour just for day one and AP flour for the rest of the days.
You’ll see me mention pineapple juice below as a replacement for the water. If you’re curious, check this article on using pineapple juice for a sourdough starter. You might want to try it out.
How long will it take before I can use it to bake?
This depends on your environment, the type of flour you use, and the quality of your water…among other things. Plan on holding off for a week or two, but you should be baking away within a couple of weeks if all goes well.
The process
I’ll reference 100 grams as the basic measure here, but using less is fine and produces less waste. It also saves money on flour. You can follow along with the recipe as is or adjust up or down as you’d like.
Day 1:
- Combine 100g of flour (whole wheat or AP) and 100g of water (bottled preferably) or pineapple juice. Stir the two ingredients together and make sure the flour is entirely incorporated. I like to clean the sides of the container with a rubber spatula.
- Cover and let it rest on the counter at room temperature for 24 hours. Cover tightly enough to be sure that you can keep bugs out, but it shouldn’t be totally air tight if you can help it. I like to rest a plate on a jar for this purpose.
Day 2:
- After 24 hours, discard half of your starter (100g). Add 100g of flour and 100g of water or pineapple juice to the remaining 100g of starter. Stir completely together like the day before.
- Cover and let rest for 24 hours as you did the previous day.
Days 3 and 4:
- On days three and four you’ll continue feeding just like you did on day two, but you can begin to feed your starter twice per day for the next few days. Just try to hit your timing at about 12 hours apart as much as you can.
Days 5 thru 7:
- Continue the same routine as you have for the past couple of days, discarding half of your starter and feeding with flour and water. Watch very closely at the behavior of your starter now.
- Watch for your starter to grow by at least double and bubble a lot a few hours after feeding.
- Pay very close attention to the smell of your starter. It should NOT smell awful by this point. It should start to smell like yeast or beer, sort of like if you were making bread (if you have any experience with commercial yeast).
- When you see clear patterns of behavior with your starter and it’s beginning to smell pleasantly yeasty, you’re just about ready to create something delicious with it. But be patient! This could take five to seven days, or it could take two weeks. Pay more attention to your starter than you do the calendar.
- When it’s ready, give it one last feeding and let it rise as high as you’ve noticed it getting over the past couple of days. You can then take what you need to bake a loaf of bread and feed the remainder again for next time.
Find your own sourdough starter routine
Once you get to this point, congratulations! The longer you keep it up, the stronger and better tasting your starter will be. Keep going with the routine of discarding half of your starter and feeding with equal weights of flour and water. Bake as often as you like, and definitely try some sourdough starter discard recipes to cut down on waste and make your family happy.
Try to find a good regimen that you’ll stick to in terms of time. You’ll get to know what your starter likes in your environment and how often you need to feed it so it will thrive. For at least a few weeks, I recommend that you just leave it out on the counter and feed it every day at about the same time. After a few weeks, you can pretty safely start to store your starter in the fridge when you’re not baking.
Do your best to feed your starter every day while it’s out of the fridge, but if you do skip a day…don’t panic…it’s fine. Just make sure to feed it as soon as you remember, and if it seems a bit sluggish feed it twice that day.
Tips and what to expect from your starter
What to expect
Smells
You can expect a whole new world of smells, scents, and odors. We’re dealing with microorganisms here. They do strange things. If you find that you have extra-ordinarily bad smells (vomit, garbage, chemicals, etc) that don’t get better after a few days of regular feedings, I would recommend ditching the batch and starting again using pineapple juice.
When the smells go right, it’s a beautiful thing. I love the smell of yeast though, so take that for what it is. I was a home brewer as well and loved the smells associated with that. That bready, yeasty, slightly sour smell that comes from fermentation is wonderful. You can expect all kinds of smells in that neighborhood – sometimes fruity, sometimes more like biscuits.
It is important, however, that you pay close attention to the smells that your starter is putting off. Unpleasant odors, especially at the beginning, don’t necessarily mean failure. As long as the smells aren’t horribly disgusting, and they don’t stay that way, time and regular feeding should start to get you closer to a lovely yeast scent.
Looks
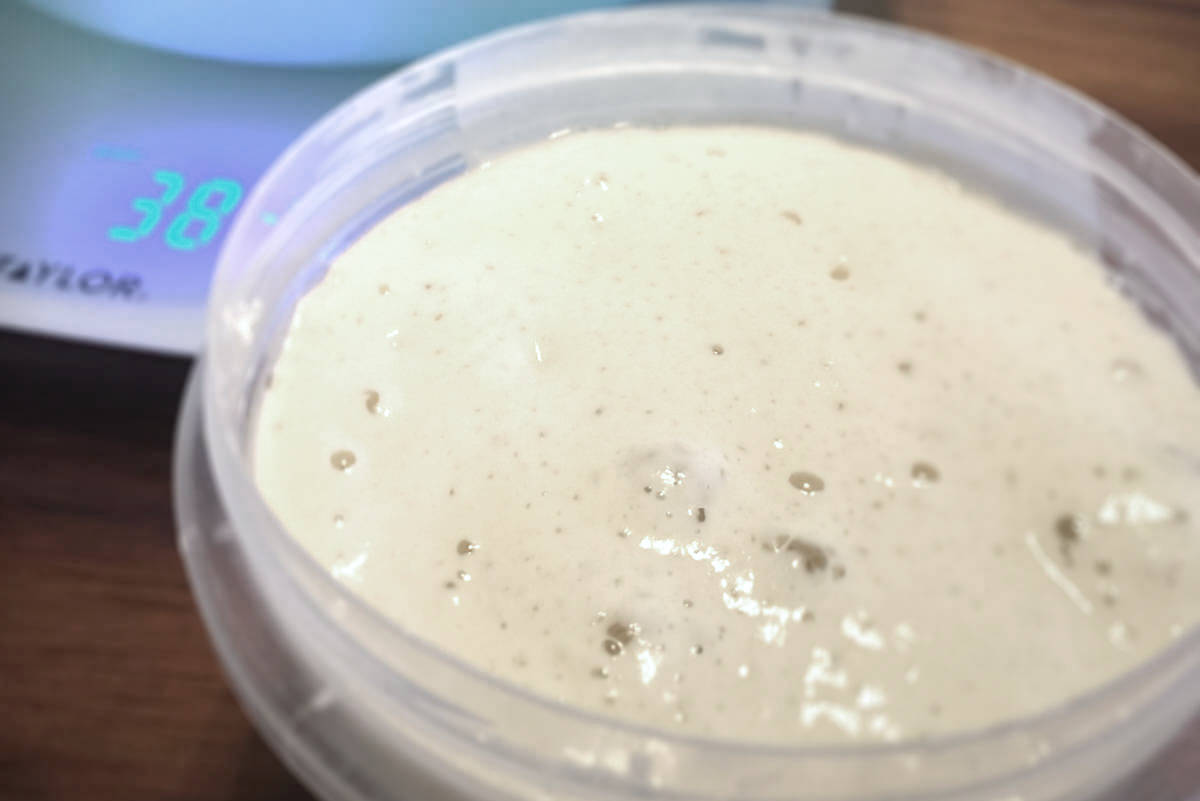
As you begin, your starter will most likely just look like thick batter. After a few days, you’ll notice that it starts to loosen up a bit a few hours after each feeding. You may start to notice some small bubbles on the surface as well. When you give it a small shake, it may jiggle a bit too.
You’ll notice the biggest differences in texture when you feed it. As you scoop it to discard some or use it in a recipe, you might notice a really cool “webbing” effect as it really starts to develop.
One other thing to pay attention to is the float test. When your starter is ripe and ready to use for bread making, it should actually float on the surface of a pool of water. If it isn’t, it doesn’t mean that it’s no good, it just means that it hasn’t gotten fully ripe and developed air bubbles that help keep it afloat. Over time, it will.
Use bottled water when you can
This is one of the biggest issues that I faced at first. My water is not all that pleasant, which surprised me to be honest. Even water filtered through our Brita wasn’t conducive to sourdough starter. I had all kinds of problems until I switched to bottled water for feeding my sourdough and for baking bread. If you have some issues that you just can’t figure out, try switching to bottled water and see if that helps.
Scale your sourdough starter for less waste
As I mentioned above, it’s very possible to scale your starter to suit your needs at almost any point. When you’re just beginning, it’s good to keep things pretty steady in terms of amounts, and you may want to use slightly larger measures until things stabilize.
Some people use tiny amounts, like 30 grams total, to keep things going long term once they have a stable starter. This doesn’t give you much discard though. So, if you enjoy making things like crumpets and crackers, you may want to take that into account.
I like to use 50 grams as my measure. It allows me to have some discard for other recipes, and it measures out really well when I bake. I generally have 150 grams of ripe starter with this method, and I use 100 grams for a loaf of bread when I bake. This leaves me 50 grams to start again…super easy.
Check out some basic sourdough starter discard recipes here.
When to store your starter in the fridge
Once you have a healthy starter and a good routine for feeding, you can start to store it in the fridge when you’re not baking. Storing your starter this way allows you to only feed it once or twice per week. My routine goes something like this…
Bake a loaf of bread. So, I will use 100g of starter for my bread and then have 50g of ripe starter left over. I will then put that in the fridge until I bake again (or pull out to feed in a week). When I pull out the starter to bake again, I will let it come back to room temperature and then feed it with 50g of flour and 50g of water. A few hours later, when my starter is ripe and ready to go, I will take out 100g of starter for my next loaf of bread. I’ll then put the leftover 50g of starter back in the fridge…and on and on. This is a really comfortable routine for me.
What if I kill my starter?
You probably will. I sure did. I killed a few actually, and I killed a couple of them in dramatic fashion. One I killed by letting bugs get into it, which left crawling little worms on the top of the plastic that was covering it…and completely traumatizing my wife in the process. The other I killed by letting bad bacteria form early on, which was honestly horrifying in terms of smell and actually exploded one morning before I woke up…again leaving my wife to bear the brunt. This last failure led to my discovery of the pineapple juice method, which is my go-to from here on out.
Anyway, if you do kill your starter, toss it and start again. That’s the beauty of this. It’s just flour and water (or pineapple juice). That is, until you’ve been feeding it for a year and have named it and fallen slightly in love. Once you kill one of those, you’ll make sure to keep backups in the future.
How long before it gets really “good”?
This is a really great question. Honestly, who knows? I will say that after a few weeks you should notice a big difference in how well your starter “works” in a recipe. It will cause your dough to rise better, and it will start to develop a more complex sourdough flavor.
The rest is really subjective. I know that after several months my starter seems to take on different qualities in terms of taste and smell. It smells less like sour-ish dough and a lot more like deeply complex sourdough bread. It starts to smell really delicious, and it’s also a lot more resilient to neglect and is more forgiving overall. I try really hard to keep it happy though.
Obviously, it’s possible for a starter to get VERY old. And I’m sure the complexity they give off in terms of smells and flavors is ridiculous. But you don’t have to have inherited a sourdough mother from your great grandmother to have something special. After six months or so of proper care, you should notice amazing things happening. When you do, come back and leave a comment about it. I’d love to hear about it.
Environmental considerations and why I switched to the pineapple juice method
The last thing I want to say here is that all of this needs to be taken with a grain of salt. In my experience, that grain of salt is your environment. How hot and how humid your world is makes a huge difference. It may speed some things up or slow them down. Just be patient and enjoy the science experiment that is food art.
Living in Hawaii taught me a lot about how big a factor the weather can play in something like developing a sourdough starter. The heat and humidity threw everything off and confused and frustrated me to no end. When something does go wrong for you too, remember to try bottled water and check out the pineapple juice method that fixed things for me.
If any of this has helped, please leave a comment and let me know. And if any of this seems totally wrong, let me know about that too. I’d be happy to answer any questions you may have.
Keep at it and have fun!